

Assuming that you have already followed Palo Alto’s instructions to set up the Global Protect portal and gateway, configuring MFA is pretty straightforward.
- #1 Create your server profile (Radius)
- #2 Create your server profile (Radius)
- #3 Create an Authentication Sequence
- #4 Apply the configuration to your Portal and Gateway
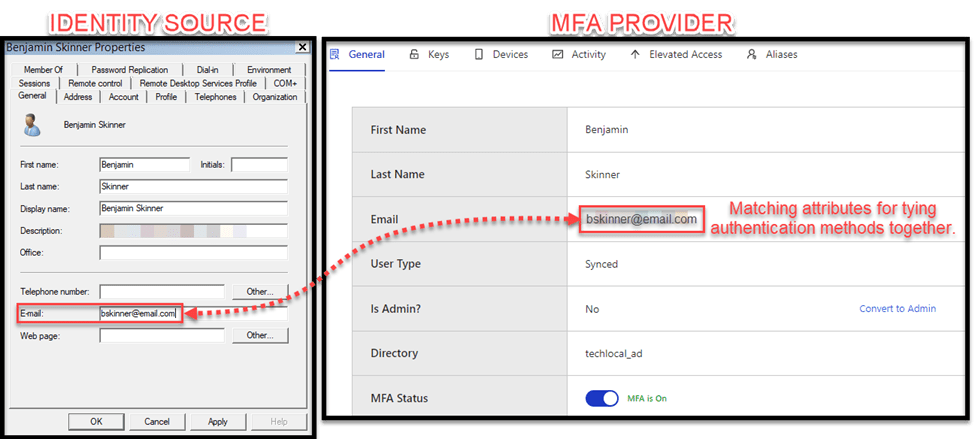
First and foremost, you need an Identity Provider that stores [and verifies] user identity and an MFA solution such as Okta, Duo, Evo Security, Jumpcloud, RSA SecurID, etc. An Identity Provider can be anything that contains the actual usernames and passwords that your users will initially authenticate against. The greatest and most understood example of this is Active Directory. Your identity source must have a compatibility with your choice of an MFA provider in order for them to direct/proxy the authentication requests or tie them back to the original source user that will be connecting to Global Protect. This could be either via local LDAP synchronization agents in the case of on-premise Active Directory or API/SAML connectivity.
SAML authentication is awesome because it lets you easily proxy connections between providers:
“Security Assertion Markup Language, or SAML, is a standardized way to tell external applications and services that a user is who they say they are. SAML makes single sign-on (SSO) technology possible by providing a way to authenticate a user once and then communicate that authentication to multiple applications. The most current version of SAML is SAML 2.0.” – Cloudflare
Essentially, as long as there is a matching user identity on either side, or the user is synchronized to the MFA provider using some other method (API/Agent), you can connect their authentication methods together using SAML. If you have an Azure/AD user on one side, you can tie that user to an MFA identity by matching an attribute on both sides, most commonly being an email address. See an example below.
Global Protect configuration:
Now that we have our two sources of authentication, we can begin by configuring the Palo Alto firewall. For this post we will be using local AD with Evo Security as our MFA solution, which will require a User-ID agent (you can find brief setup instructions here) and radius setup on the firewall. The details of Radius will be left for another blog on another day.
Once you setup your first form of authentication to your identity source (local DB, active directory, etc), follow these steps.
- Create your server profile for your MFA authentication (Radius/SAML/MFA).
- Configure an authentication profile.
- Create an authentication sequence and select your previously created profile.
- Apply the profiles to your portal and gateway in their respective order.
#1 Create your server profile (Radius)
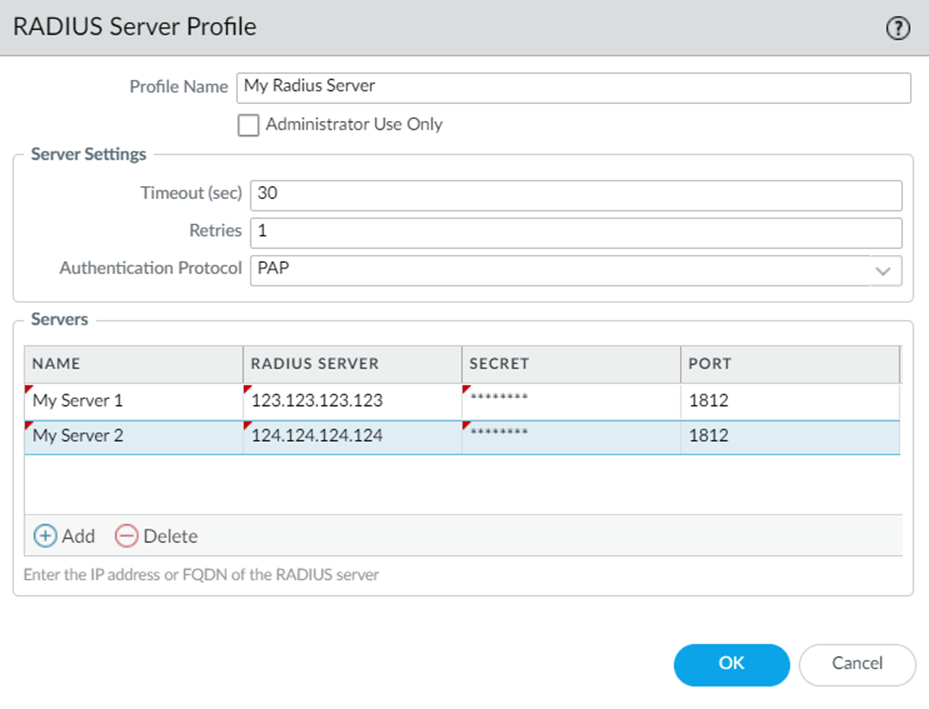
Under Firewall -> Devices -> Server Profiles -> RADIUS: add a new profile.
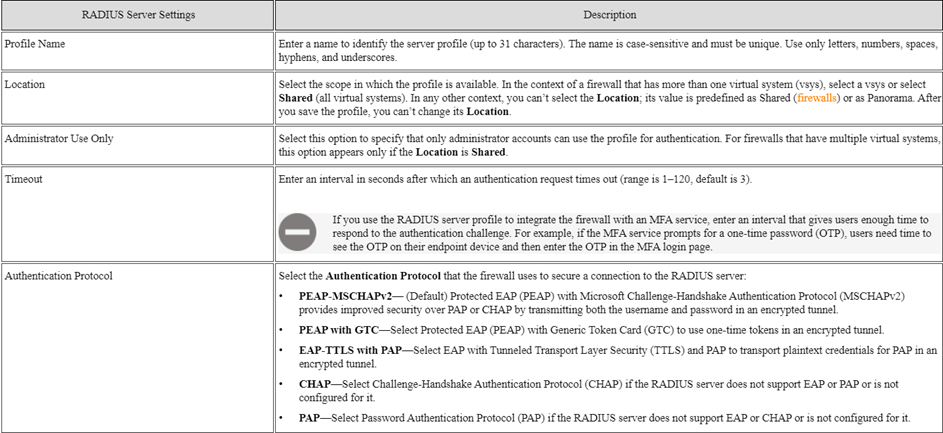
- Timeout (sec) -> How long will the Firewall wait before timing out the connection. Since our Radius server is one that is being hosted by the MFA provider (and proxying the request through MFA for TOTP/Push) we should try to match it with whatever timeout values they provide. If you are unsure, it’s best to set this value higher since you’d rather the Radius server return a timeout response to the firewall rather than the firewall timing out the request itself.
- Retries -> How many times the firewall will retry (resend) the authentication request after it times out. In my experience, it doesn’t make sense to set this higher than 1 try, since the authentication will usually fail once things timeout and a new request will need to be initiated.
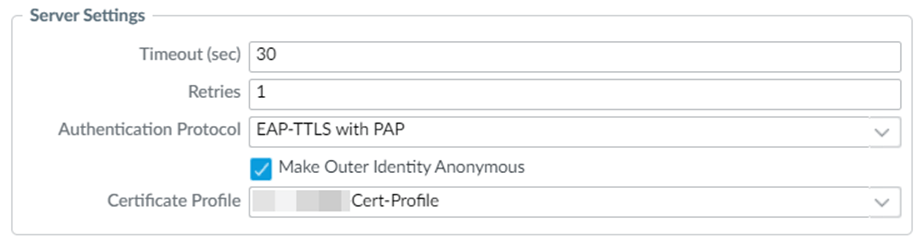
- Authentication Protocol -> How the firewall with connect to the Radius server when proxying the authentication requests. The most commonly used are PAP (that uses plaintext except for MD5 encryption on the passwords that is entirely dependent on the Radius Secret), which is highly vulnerable to compromise (read up on BlastRadius CVE), and EAP-TTLS. EAP-TTLS is commonly known as RadSec and utilizes certificate PKI for validating and forming secure encrypted communication between the firewall and Radius server. Both sides have to support this for it to work.
- Radius Server -> The IP address of the Radius server in question. You can utilize multiple Radius servers for redundancy.
- Secret -> This is the Pre-shared Key that both sides are configured to use for verifying the authentication attempt (and encrypting the password using MD5 in the case of PAP).
- Port -> The authentication port defined by the Radius server configuration. The default for Radius is 1812, however it may vary depending on the implementation.
#2 Create your server profile (Radius)
Under Firewall -> Devices -> Authentication Profile: add a new profile
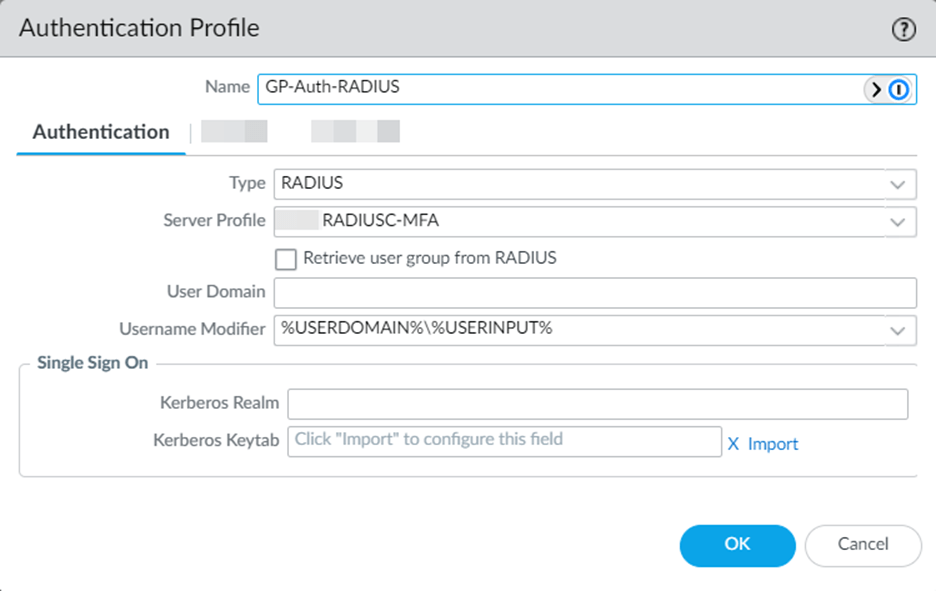
- Type -> Select the Authentication type—in our case this is RADIUS.
- Server Profile -> This the profile we configured in Step 1.
- User Domain -> Here we can configure a FQDN/Domain to append or prepend, depending on the format needed (NETBIOS/UPN) onto the username that is provided. For example, if we define this field as email.com, then if a user types in their username as bskinner it will be modified according to the configuration below.
- Username Modifier -> This is where you define the format of how the username is modified with the provided User Domain. The example in the screenshot would yield “email.com\bskinner” automatically, if the User Domain was configured as “email.com” and the username provided during authentication is “bskinner”. You can also select the UPN format which will format it as “bskinner@email.com”.
In this configuration, we can ignore all other options.
#3 Create an Authentication Sequence
Under Firewall -> Devices -> Authentication Sequence: add a new sequence
This section is straightforward. Just define the authentication profiles that you want to authenticate with in a top-down flow. These sequences will be what we define in the Portal and Gateway. For now, configure your first method of authentication on the Portal (username/password) and name it something along the lines of “Portal_Sequence”, then configure your second method using the MFA configuration (Radius) and name it something along the lines of “Gateway_Sequence”. The reason for this will be made clear in the following steps.

#4 Apply the configuration to your Portal and Gateway
Under Firewall -> Network -> GlobalProtect -> Portals / Gateways.
- Portal -> Authentication -> Client Authentication -> [Select a configuration line]
Specify your first authentication sequence under the Authentication Profile. In our case this is the User-ID LDAP connection for authenticating users to the portal.
- Gateway -> Authentication -> Client Authentication -> [Select a configuration line]
Specify your second MFA authentication sequence under the Authentication Profile. In our case this is the RADIUS configuration that proxies the user authentication to trigger MFA.
So, why do we have to split up the authentication of our first and second factors between the portal and the gateway? The portal and gateway have two distinct purposes.
Global Protect Portal – This is the landing zone of the Global Protect endpoint clients. The clients will connect to the portal and be subsequently redirected to the appropriate gateway depending on their Portal Agent Configuration…
“The GlobalProtect portal provides the management functions for your GlobalProtect infrastructure. Every endpoint that participates in the GlobalProtect network receives configuration information from the portal, including information about available gateways and any client certificates that may be required to connect to the gateways. In addition, the portal controls the behavior and distribution of the GlobalProtect app software to both macOS and Windows endpoints.” – Palo Alto Documentation
Global Protect Gateway – This is the actual client IPSEC/SSL aggregator that endpoints connect to. It’s the gateway into the network. The portal directs endpoints to the IP or FQDN of the gateway that they will actually “establish a VPN to”.
In this context, when we configure the authentication methods, since the portal and the gateway are technically two separate connections/phases, they each need some authentication method. Technically we could configure both first and second authentication factors (profiles) in the same sequence and apply them against the portal / gateway—however—this will cause users to undergo the same authentication twice. If the MFA profile is applied to both the portal and the gateway, they will have to respond to two separate MFA challenges.
The solution is to split up the authentication methods between the two, so they provide their username/password when authenticating to the portal, and then receive a challenge once the client is directed towards authenticating against the gateway (for the actual VPN connection to establish). You could try overcoming this by configuring certificate authentication as the gateway’s form of authentication and then utilizing both authentication profiles in a sequence for the portal, but that’s beyond the scope of this blog post.

Leave a comment